Recent posts


Shop the article


Film Speed Explained: What It Is and How It Affects Your Photos
Film Speed is a measure of a film’s sensitivity to light. It is commonly referred to as the film’s ISO rating, with the most common film speeds being ISO 400, ISO 200 and ISO 100. If one film has double the ISO rating of another, that means that it is twice as sensitive to light, and may be called a ‘faster’ film.
Film sensitivity is a core principle in film photography. It is an important part of the equation for an accurate photographic exposure but it is also a creative choice due to the different ‘look’ you tend to get from different film speeds.
We’ll cover both of these points, starting with how you can use film speed - light sensitivity - to take a well-exposed photo.
Exposure triangle
The exposure triangle is a fundamental concept in photography that refers to the relationship between three key elements: aperture, shutter speed, and film (or sensor) sensitivity.
Aperture is the size of the opening in the lens through which light passes.
Shutter speed is the amount of time the camera's shutter stays open to allow light to enter.
Film sensitivity is the sensitivity of the camera's film to light. In digital photography this is replaced by ‘sensor sensitivity’ - also measured as an ISO number.
The relationship between these three elements determines the exposure of the image. Changing one element requires adjusting one or both of the others to maintain the correct exposure. So increasing the aperture to allow more light in would require a faster shutter speed or lower ISO to maintain the correct exposure.

Each of them brings different creative choices, and the right application of each will often make up a photographer’s personal aesthetic and stamp (alongside colour, composition etc).
For example - a large aperture allows you to blur the background behind a subject thanks to a smaller depth of field. If the light stays the same and you want to increase the aperture, then you need to shorten the shutter speed or decrease the film sensitivity or a combination of the two - in order to get a good exposure of the scene.
Similarly you may choose a faster shutter speed to ‘freeze’ the action in your camera. This is an essential skill in sports photography, among other things! This will require a larger aperture or a more sensitive film in order to capture the photograph.
In digital cameras, changing the ISO is as simple as moving a dial - and these days there are all kinds of clever software shortcuts that allow the same physical sensor to capture at higher effective ISO than you would expect.
But for us film photographers it’s simpler. Because we cannot use software to improve light sensitivity while we take the photo…we can’t even change ISO between frames! And funnily enough that's one of the reasons why people still shoot film.
It's also why you would often see professional film photographers - particularly in situations with changing light like sports or weddings - carry multiple cameras. So that they can move seamlessly between the inside of a church and the bright courtyard outside - without needing to change rolls of film.

(c) Paul McKay. Inside a tattoo parlour taken on Kodak Portra 800 - it would have been difficult to capture this detail with a film slower than ISO 800!
Measuring film speed: the history of ISO
There have been a huge number of different attempts to agree on a universal standard of film sensitivity. If you think back to the late 1800s, the first photographers were people coating their own glass plates from their own chemistry. And as the global community grew, they wanted to learn from each other. But can you imagine someone shooting Canada landscapes writing to someone shooting portraits in Italy and trying to compare results and formulae without any way of measuring the relative lighting? There was a clear challenge that needed a universal standard for light sensitivity.
The first attempt to find any meaningful success was from a chap called Władysław Małachowski - a Polish engineer in 1880. His idea was to produce standardised glass plates with different densities of dark pigmentaion, so if you took a photo under a carefully described situation (burning magnesium ribbon at a certain distance) you could read off the dimmest version that you could see in the photo. And that would give the speed of your emulsion to compare with others!
However you still have issues if the plates (which were sold commercially) had been stored at different temperatures, or moisture etc - they wouldn’t be truly comparable - and in reality this made it difficult to truly nail down an universal standard.
One of the next breakthroughs came from a German astronomer called Julius Scheiner in 1894. He brought more mathematical rigour to the problem - using a system that proscribed a specific light exposure, and timing how long it took to see a darkening in the plate being tested.
This was probably where film sensitivity first came to be described as ‘speed’ - because the spot would appear faster in a ‘faster’ - more sensitive - glass plate.
But his system was almost immediately broken down into competing standards as people tweaked the formulae - so it never caught on as a true international standard. There were also issues with all these early standards as film manufacturers would creatively use whichever sub-version gave their chemistry the best results! And at a time when even the best emulsions needed several minutes for a successful exposure, promising the ‘most sensitive’ numbers were a fast way to increase sales.

The increasing complexity of different standards lead to tables such as these becoming neccesary for amateur film photographers to pack in their camera bags!
In 1934 we then got the German DIN. This was often expressed as degree fractions of ten - like 15°/10 - and became the best-used European-based standard until the 1980s. It could be confusing in that the scale was logarithmic so if you wanted a film to be twice as fast then you’d be looking to add 3/10 each time. This made for complicated calculations for photographers looking to capture an accurate exposure!
Meanwhile in America there were a few companies trying to create their own standard (including Weston and General Electric) - which would also involve them selling meters and booklets to inform the growing crowd of professional and amateur photographers.
This turned in 1943 into the ASA scale. A 200 speed film was defined as twice as fast as 100 - simpler than DIN’s ‘one stop is 3/10 of a degree’, and agreed by the independent American National Standards Institute.
After the second world war USSR didn’t want to use a ‘European’ German or American standard, and instead used ‘GOST’ which was very similar to ASA but not enough that they could be claimed to be identical. You may still see GOST markings on pre-1987 USSR cameras and meters.
In 1974 the ASA and DIN standards were combined into the ISO standard. And technically ISO is expressed as both together: e.g. 400/27°. If you just use the first number you are actually referring to the ASA (or the first half of the ISO) - but this is so commonplace nowadays that for the rest of the article I will follow convention (referring to films as ISO 100 etc) rather than the full technical phrase.
My favourite final fact on the history before we move into application is the origin of the word ISO itself. ISO is an independent organisation based in Geneva and responsible for creating various industrial standards across many industries - often related to design specifications or safety certification. You may see ‘ISO standards’ on your washing machine or in health and safety situations for example.
The organisation is called International Organisation of Standardisation… which actually reads IOS, not ISO… But they claim “ISO is derived from the Greek word isos (ίσος, meaning "equal")” - which we can believe them if they want!

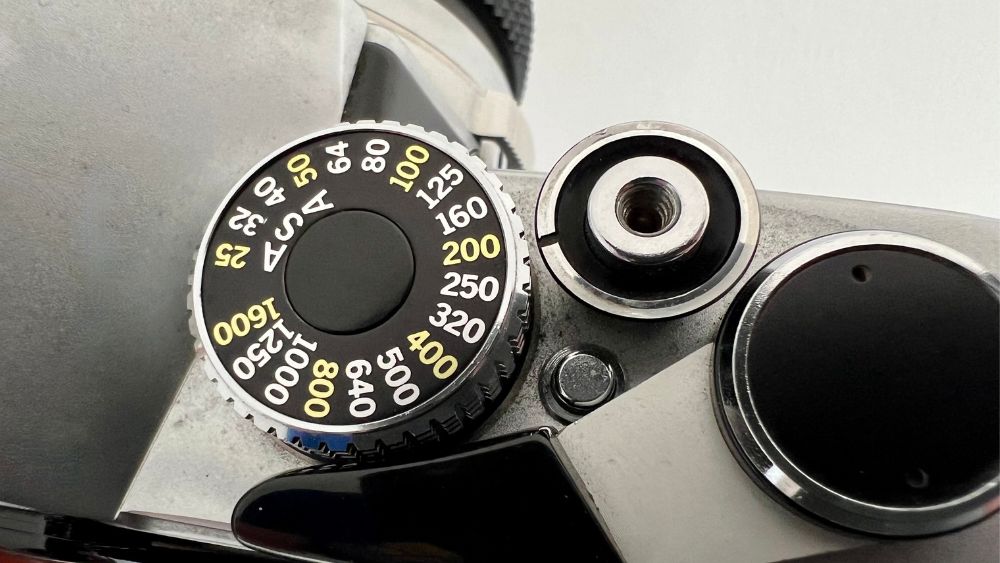
The Kentmere 100 film canister showing the full ISO standard of film sensitivity of the film: 100/21°. You can also see a little box to mark whether the photographer shot the film at 100 or 200 - which would be pushing the film. See later section for more info!
How do the ISO numbers work?
We’ve seen that there were different ways of measuring light sensitivity and film speed - and some of them counted up in set numbers (like DIN) to correlate with exposure ‘stops’.
However one of the reasons that ISO numbers caught on so well, was because the numbers correspond to light sensitivity in a more direct way. You double the ISO; you double the sensitivity of the film. You double it again; it doubles again! And vice versa with halving.
For example, an ISO 400 film is twice as sensitive to light as an ISO 200 film, and an ISO 800 film is four times as sensitive as an ISO 200 film.
Each doubling or halving is equivalent to an exposure ‘stop’ - similar to doubling or halving the shutter speed - which makes it quick to calculate during a shoot.
What ISO should I use?
With over 200 films available to buy, and ISO being one of the main distinctions between them, this is a common question!
And the answer generally comes down to two factors: lighting situation, and creative choice.
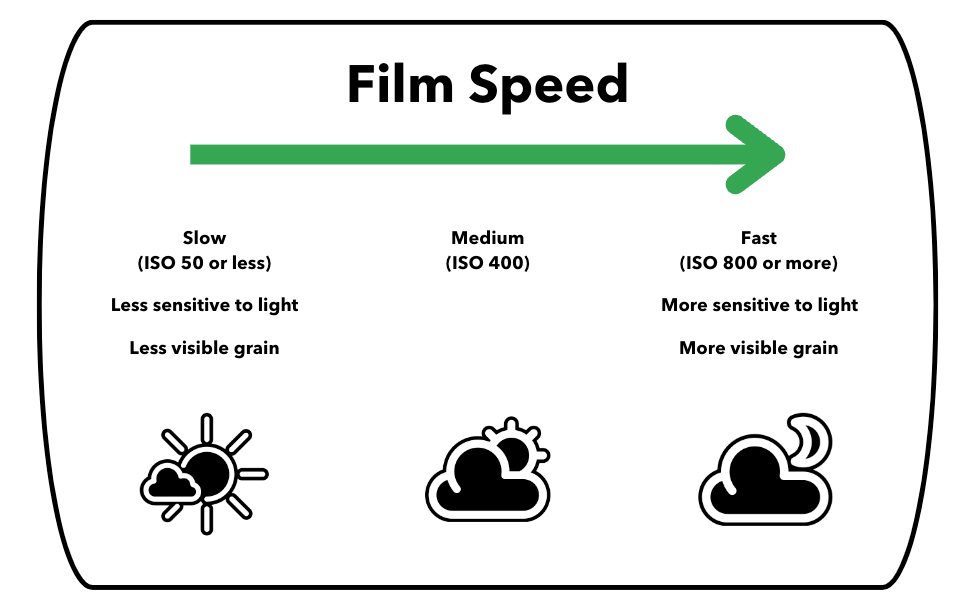
A low ISO film, such as 100 or 200, produces sharper images with less grain, but will require more light to capture an image.
A high ISO film, such as 400 or 800, results in brighter images in low-light environments but can introduce more grain in the photo.
And if you are still at the beginning of your film photography adventures then this is probably all you need to consider!
Exploring your creativity with ISO
If you’re comfortable with the basics of film speed and want to explore the creative options that are possible with different ISO then let’s look at a holiday example.
Say that you are off to Ibiza and expect to be shooting lots of film in bright sunlight at the beach. You are going to need a lower ISO for this (lighting situation). BUT if you enjoy using a fast shutter speed to freeze the action, and a small aperture to make sure everything is in focus, then you will need a higher ISO than someone who shoots at a slower shutter speed and with larger aperture (creative choice).
So you may end up with Kodak Portra 400 - and your friend might stick with Kodak Portra 160. The same lighting situation but different creative choices!
As a second example - you may enjoy the grain that you get in your photos when you use film at speeds above 800. In which case you are likely to compensate with faster shutters and smaller apertures in any lighting situation in order to create images that match your creative vision, and you might only ever use Ilford Delta 3200!
You’ll need a good understanding of the exposure triangle - and a camera with enough shutter and aperture settings to allow you to balance the light needs - but it’s absolutely possible to shoot film in this way.

I used Kodak T-Max P3200 film to capture the drama of this industrial fire in 2019 - despite the bright day I increased shutter speed and closed down my aperture to make sure that it wasn't exposed. The strong grain and murky detail are part of the reason I really enjoy the resulting image!
Pushing and pulling film: messing with ISO
Pushing and pulling film refer to analogue techniques used to intentionally under or overexpose film during shooting, followed by adjustments in film development, to produce a final image that still has good detail across light and shadows.
Pushing film involves under-exposing the film during shooting and then over-developing it during processing to produce a well-exposed final image. This technique can be used to compensate for low-light conditions, or to achieve a specific artistic effect, such as increased contrast or grain.
The easiest way to under-expose the film is by setting your camera at a higher ISO - making the camera ‘think’ that the film is faster than it is, and so letting in less light than normal when capturing an image. If your camera doesn’t have ISO settings - no inbuilt light meter or auto exposure - than you can achieve the same result by making a manual adjustment of 1 or 2 stops when calculating your settings.
Pulling film is the opposite process, involves over-exposing the film during shooting and then under-developing it during film processing to again produce a final image with good detail and exposure. This technique can be used to compensate for bright lighting conditions, or to produce a softer, less contrasty image.
If you want to use your camera settings to easily pull film then you can set the ISO at a lower number than the film - this will encourage the camera to think that the film needs more light than it does, over-exposing it when you press the shutter.
The benefit of pushing and pulling film is that it allows photographers to achieve a specific artistic vision, or to compensate for challenging lighting conditions, without having to change film stocks. It's a creative tool that can add depth and nuance to a photographer's work.
To learn more about pushing film, and for some tips and tricks from the community on the best films to push, check out our blog on pushing film.
You must remember to tell your developing lab that you have pushed or pulled your film - because they will need to make the necessary adjustments in development to get the desired result! Often that’s as simple as leaving a note with the film when you send it in, or even writing on the canister itself in permanent pen.
Some film speed quirks
There are some films - like Lomography’s redscale or their Lomochrome films - that provide a range of ISOs that you can use to shoot the film. This isn’t about the exposure level but the colour impact. Most films have a fantastic exposure latitude of a couple of stops, so you’re unlikely to notice a huge difference in exposure of, for example, Colorplus at 100 vs 200. But with some of Lomography’s ‘funky’ films you can get different COLOUR shifts at different ISO, and therefore slightly different images in the same light.
This is because ISO is actually an average number for a film. In reality the ISO of a film with green light will be different to red light. So our wonderful friends at ISO have created a way to make this a meaningful average to compare one manufacturer’s films with another - but what Lomography play with is the idea that shooting certain film slightly ‘over’ exposed will create a different colour balance vs ‘under’ exposed.

The same scene, shot on Lomography Metropolis film, with the camera set at different ISO
Film speed explained: conclusion
The concept of film speed being a measure of film's sensitivity to light is a simple one, and learning which of the most common ISO ratings (between 100-800) will be best for different light situations is enough for most film photographers to know.
However there are some more technical creative results possible if you are interested in exploring the benefits of pushing film, pulling film, or shooting Lomography films at slightly different ISO ratings.
As always we would encourage you to explore, to experiment, and to reach out to us if you have any questions
Ready to dive in?
Keep Reading
View all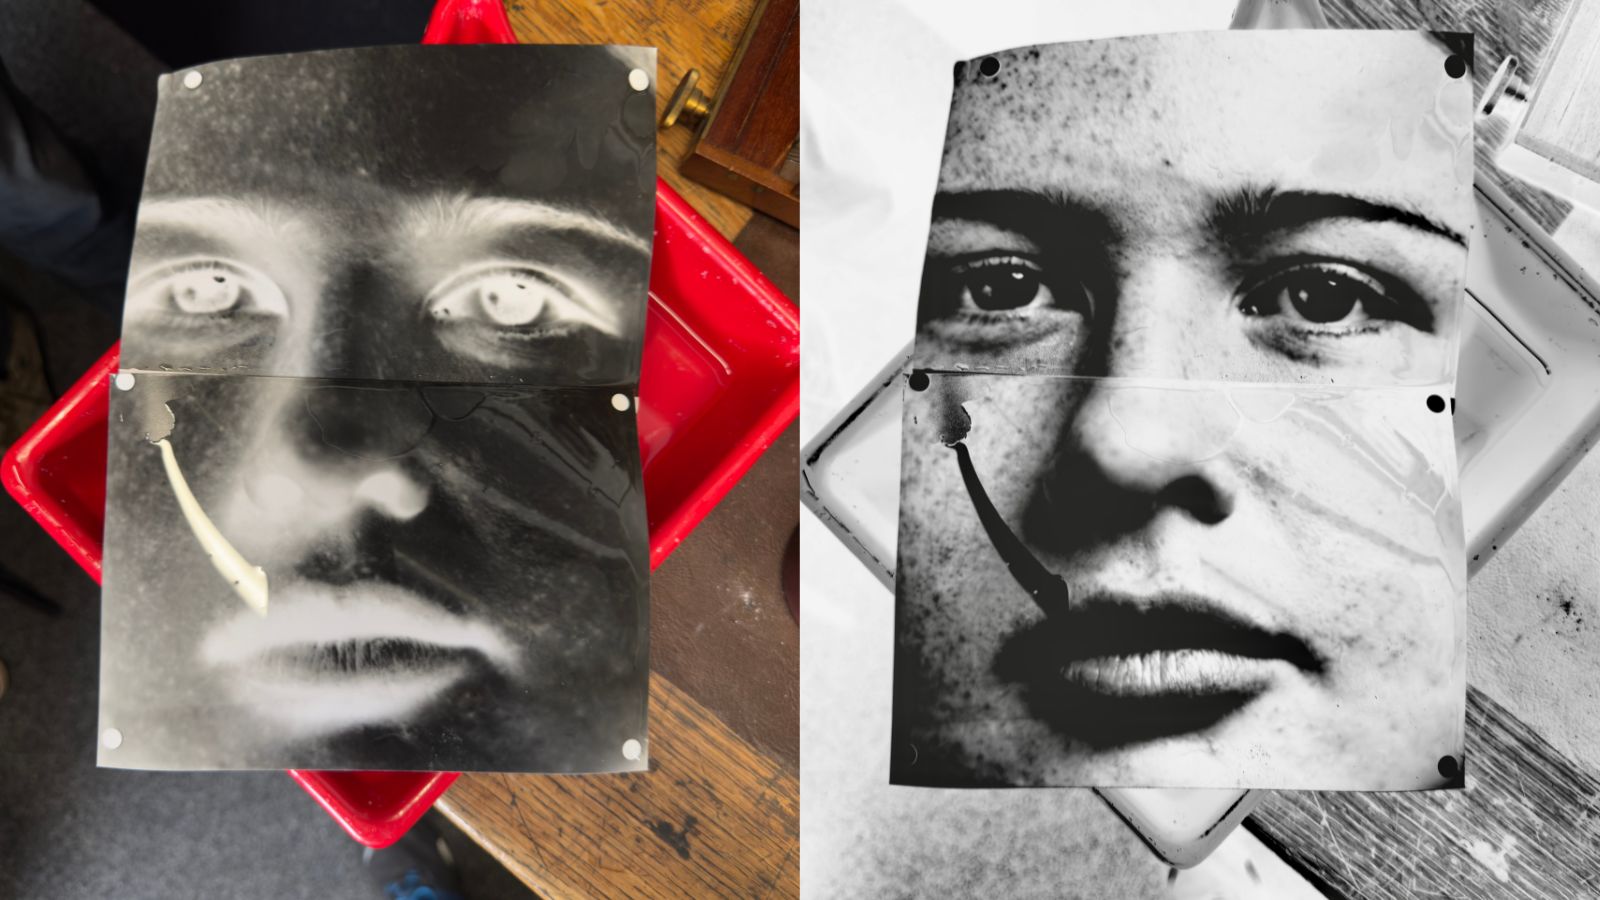
A Massive Camera In The Middle of Stirling: What Could Go Wrong?
Al Dawes set up a Camera Obscura in the middle of Stirling to promote the photography festival - and celebrate the Big Film PhotoWalk, and captured stunning images!
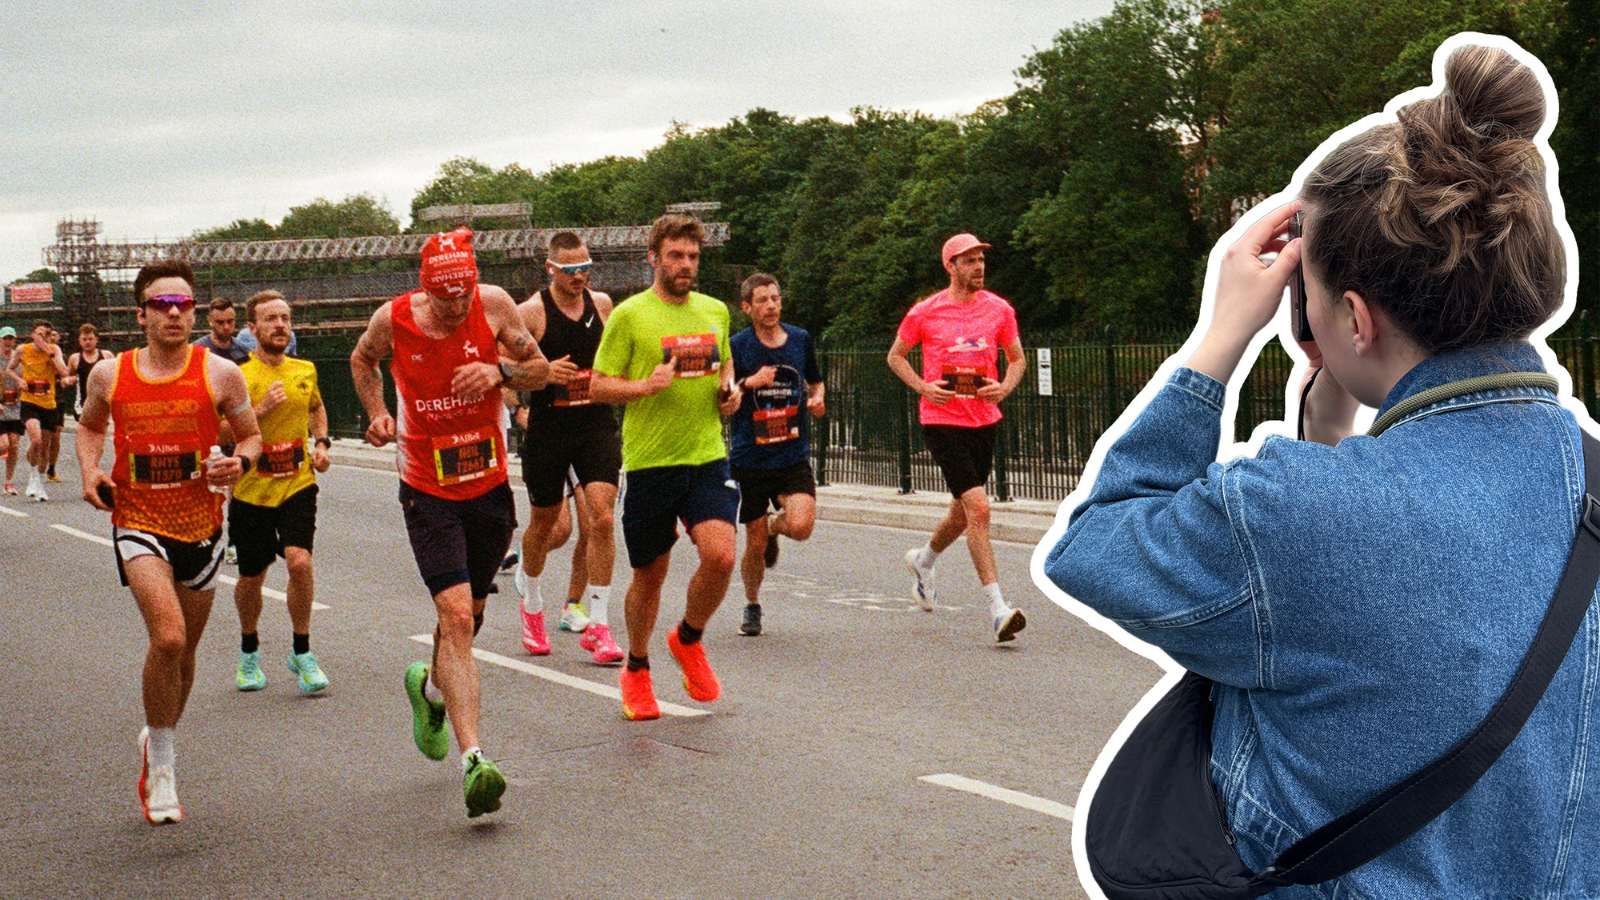
Bristol Half Marathon: Through an Analogue Lens
Masha the Analogue Adventurer takes to the Bristol streets with her cameras to capture the Great Run on 35mm film

- Opens in a new window.
3 Comments -
ALISSA JEAN MONTAIE • -
taylor • -
Simon •
Thank YOU for ALL OF THIS!!!! Still trying to fully understand the “triangle” and this was very helpful
just getting into film photography for the first time and trying to understand the difference between film speeds, thanks for the explanation!!!
Negative films have good exposure latitude.
If however, you’re using Positive film, then the latitude is generally much lower (one reason of many I’ve usually used transparencies).